Custom Lobes
Extend OctoMY™ with custom processing modules
Custom Lobes
Learn how to create custom Lobes to extend OctoMY™'s capabilities with specialized processing, AI integration, or custom hardware support.
Pro Tip
Before creating a custom lobe, check if a built-in lobe already supports your needs. Custom lobes are powerful but require C++ development and rebuild cycles.
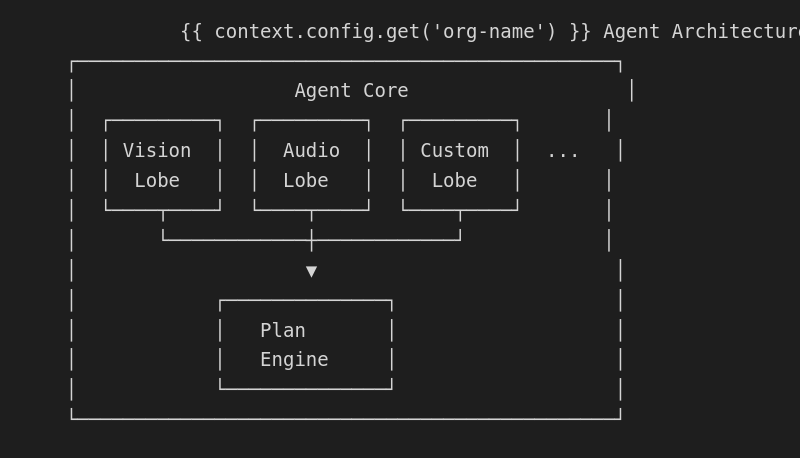
What are Lobes?
Lobes are modular processing components that extend OctoMY™:
Built-in lobes
| Lobe | Purpose |
|---|---|
| Vision | Camera processing, object detection |
| Audio | Sound input/output, speech |
| GPS | Location tracking |
| Sensors | Hardware sensor abstraction |
| Comms | Network communication |
Why custom lobes?
- Custom hardware - Support specialized sensors/actuators
- AI integration - Add ML models, LLM, or computer vision
- Protocols - Implement proprietary communication
- Processing - Custom data processing pipelines
Did You Know?
The name "Lobe" comes from brain anatomy - just as brain lobes handle specialized functions (vision, language, motor control), OctoMY™ Lobes handle specialized robot functions.
Lobe architecture
Lobe interface
All Lobes implement the ILobe interface:
class ILobe : public QObject {
    Q_OBJECT

public:
    // Lifecycle
    virtual QString name() const = 0;
    virtual bool initialize() = 0;
    virtual void shutdown() = 0;

    // Processing
    virtual void process() = 0;

    // Status
    virtual LobeStatus status() const = 0;

signals:
    void statusChanged(LobeStatus status);
    void dataReady(const QVariantMap &data);
};
Lobe lifecycle

Step 1: Create lobe structure
File structure
src/libs/liblobes/
├── lobes/
│   └── myCustomLobe/
│       ├── MyCustomLobe.hpp
│       ├── MyCustomLobe.cpp
│       └── MyCustomLobe.qbs
└── lobes.qbs
Header file
// MyCustomLobe.hpp
#pragma once

#include "lobes/ILobe.hpp"

#include <QObject>
#include <QTimer>

class MyCustomLobe : public ILobe {
    Q_OBJECT

public:
    explicit MyCustomLobe(QObject *parent = nullptr);
    ~MyCustomLobe() override;

    // ILobe interface
    QString name() const override;
    bool initialize() override;
    void shutdown() override;
    void process() override;
    LobeStatus status() const override;

    // Custom methods
    double getCustomValue() const;
    void setParameter(const QString &key, const QVariant &value);

signals:
    void customDataReady(double value);

private slots:
    void onTimerTick();

private:
    QTimer *mProcessTimer{nullptr};
    LobeStatus mStatus{LobeStatus::Uninitialized};
    double mCustomValue{0.0};

    // Configuration
    int mUpdateRate{20};  // Hz
};
Implementation
// MyCustomLobe.cpp
#include "MyCustomLobe.hpp"

#include <QDebug>

MyCustomLobe::MyCustomLobe(QObject *parent)
    : ILobe(parent)
    , mProcessTimer(new QTimer(this))
{
    connect(mProcessTimer, &QTimer::timeout,
            this, &MyCustomLobe::onTimerTick);
}

MyCustomLobe::~MyCustomLobe() {
    shutdown();
}

QString MyCustomLobe::name() const {
    return QStringLiteral("MyCustomLobe");
}

bool MyCustomLobe::initialize() {
    qDebug() << "Initializing MyCustomLobe";

    // Initialize resources
    // Connect to hardware, load models, etc.

    mStatus = LobeStatus::Initialized;
    emit statusChanged(mStatus);

    // Start processing
    mProcessTimer->start(1000 / mUpdateRate);
    mStatus = LobeStatus::Running;
    emit statusChanged(mStatus);

    return true;
}

void MyCustomLobe::shutdown() {
    if (mStatus == LobeStatus::Running) {
        mProcessTimer->stop();

        // Clean up resources

        mStatus = LobeStatus::Stopped;
        emit statusChanged(mStatus);
    }
}

void MyCustomLobe::process() {
    // Called each timer tick
    // Do your processing here

    // Example: generate some data
    mCustomValue = qrand() / (double)RAND_MAX * 100.0;

    // Emit data for Plans to consume
    emit customDataReady(mCustomValue);

    QVariantMap data;
    data["value"] = mCustomValue;
    data["timestamp"] = QDateTime::currentMSecsSinceEpoch();
    emit dataReady(data);
}

void MyCustomLobe::onTimerTick() {
    process();
}

LobeStatus MyCustomLobe::status() const {
    return mStatus;
}

double MyCustomLobe::getCustomValue() const {
    return mCustomValue;
}

void MyCustomLobe::setParameter(const QString &key, const QVariant &value) {
    if (key == "updateRate") {
        mUpdateRate = value.toInt();
        if (mProcessTimer->isActive()) {
            mProcessTimer->setInterval(1000 / mUpdateRate);
        }
    }
}
Security Consideration
Custom lobes have full access to the Agent's resources. Be careful when loading external models or connecting to network services. Validate all inputs and handle errors gracefully.
Step 2: Register the lobe
Lobe registry
Register your Lobe with the Agent:
// In LobeFactory.cpp
#include "lobes/myCustomLobe/MyCustomLobe.hpp"

ILobe* LobeFactory::createLobe(const QString &name) {
    if (name == "MyCustomLobe") {
        return new MyCustomLobe();
    }
    // ... other lobes
    return nullptr;
}

QStringList LobeFactory::availableLobes() {
    return {
        "VisionLobe",
        "AudioLobe",
        "MyCustomLobe",  // Add here
        // ...
    };
}
Configuration
Enable in Agent configuration:
{
    "lobes": {
        "MyCustomLobe": {
            "enabled": true,
            "updateRate": 30,
            "customParam": "value"
        }
    }
}
Step 3: Access from plans
OPAL integration
Access your Lobe from OPAL plans:
plan UseCustomLobe {
    loop {
        // Read data from custom lobe
        var value = lobes.MyCustomLobe.value

        log("Custom value: " + value)

        if value > 50 {
            do_something()
        }

        delay(100)
    }
}
Event handling
React to Lobe events:
plan ReactToLobe {
    // Called when lobe emits data
    on lobe_data("MyCustomLobe") { data ->
        log("Got data: " + data.value)
        process_data(data)
    }

    loop {
        // Normal plan logic
        delay(100)
    }
}
Example: AI vision lobe
A Lobe that uses OpenCV for object detection:
Pro Tip
OpenCV's Haar cascades are fast but not as accurate as modern deep learning. For production face detection, consider using dlib or a DNN-based approach instead.
// AiVisionLobe.hpp
#pragma once

#include "lobes/ILobe.hpp"

#include <QObject>
#include <QImage>

class AiVisionLobe : public ILobe {
    Q_OBJECT

public:
    explicit AiVisionLobe(QObject *parent = nullptr);

    QString name() const override { return "AiVision"; }
    bool initialize() override;
    void shutdown() override;
    void process() override;
    LobeStatus status() const override;

    // Vision methods
    QList<DetectedObject> detectObjects(const QImage &frame);

signals:
    void objectsDetected(const QList<DetectedObject> &objects);

private:
    void processFrame(const QImage &frame);

    cv::CascadeClassifier mClassifier;
    bool mInitialized{false};
};
// AiVisionLobe.cpp
#include "AiVisionLobe.hpp"

#include <opencv2/opencv.hpp>

bool AiVisionLobe::initialize() {
    // Load Haar cascade for face detection
    QString cascadePath = ":/cascades/haarcascade_frontalface.xml";

    if (!mClassifier.load(cascadePath.toStdString())) {
        qWarning() << "Failed to load cascade";
        return false;
    }

    mInitialized = true;
    return true;
}

void AiVisionLobe::process() {
    // Get frame from camera (via CameraLobe or direct)
    QImage frame = getCameraFrame();

    if (!frame.isNull()) {
        processFrame(frame);
    }
}

void AiVisionLobe::processFrame(const QImage &frame) {
    // Convert to OpenCV format
    cv::Mat cvFrame = qImageToCvMat(frame);
    cv::Mat gray;
    cv::cvtColor(cvFrame, gray, cv::COLOR_BGR2GRAY);

    // Detect faces
    std::vector<cv::Rect> faces;
    mClassifier.detectMultiScale(gray, faces, 1.1, 3);

    // Convert to DetectedObject list
    QList<DetectedObject> objects;
    for (const auto &face : faces) {
        DetectedObject obj;
        obj.type = "face";
        obj.rect = QRect(face.x, face.y, face.width, face.height);
        obj.confidence = 1.0;
        objects.append(obj);
    }

    emit objectsDetected(objects);
}
Use in Plans
plan FaceTracker {
    on lobe_data("AiVision") { data ->
        if data.objects.length > 0 {
            var face = data.objects[0]
            var center_x = face.rect.x + face.rect.width / 2

            // Track face with pan servo
            var frame_center = 320  // Assuming 640px width
            var error = center_x - frame_center

            servos.pan = servos.pan - error * 0.1
        }
    }

    loop {
        delay(50)
    }
}
Example: LLM integration lobe
Integrate an LLM for natural language understanding:
// LlmLobe.hpp
#pragma once

#include "lobes/ILobe.hpp"

class LlmLobe : public ILobe {
    Q_OBJECT

public:
    QString name() const override { return "LLM"; }
    bool initialize() override;
    void process() override;

    // Query the LLM
    Q_INVOKABLE QString query(const QString &prompt);
    Q_INVOKABLE void queryAsync(const QString &prompt);

signals:
    void responseReady(const QString &response);

private:
    QNetworkAccessManager *mNetwork{nullptr};
    QString mApiKey;
    QString mEndpoint;
};
// LlmLobe.cpp
void LlmLobe::queryAsync(const QString &prompt) {
    QJsonObject request;
    request["model"] = "gpt-4";
    request["messages"] = QJsonArray{
        QJsonObject{
            {"role", "system"},
            {"content", "You are a robot assistant. Respond concisely."}
        },
        QJsonObject{
            {"role", "user"},
            {"content", prompt}
        }
    };

    QNetworkRequest req(QUrl(mEndpoint));
    req.setHeader(QNetworkRequest::ContentTypeHeader, "application/json");
    req.setRawHeader("Authorization", ("Bearer " + mApiKey).toUtf8());

    auto *reply = mNetwork->post(req, QJsonDocument(request).toJson());
    connect(reply, &QNetworkReply::finished, [this, reply]() {
        auto response = QJsonDocument::fromJson(reply->readAll());
        QString text = response["choices"][0]["message"]["content"].toString();
        emit responseReady(text);
        reply->deleteLater();
    });
}
Use in Plans
plan VoiceAssistant {
    on voice_command(cmd) {
        // Send to LLM
        lobes.LLM.queryAsync(cmd)
    }

    on lobe_data("LLM") { response ->
        // Speak the response
        speak(response.text)

        // Parse for actions
        if response.text.contains("turn left") {
            turn_left()
        }
    }
}
Example: Custom sensor lobe
Support a custom sensor protocol:
// LidarLobe.hpp
class LidarLobe : public ILobe {
    Q_OBJECT

public:
    QString name() const override { return "Lidar"; }
    bool initialize() override;
    void process() override;

    // Get scan data
    QVector<float> getScanDistances() const;
    float getDistanceAtAngle(float angle) const;

signals:
    void scanComplete(const QVector<float> &distances);

private:
    void parseScanData(const QByteArray &data);

    QSerialPort *mSerial{nullptr};
    QVector<float> mDistances;  // 360 readings
};
Use in Plans
plan LidarNavigation {
    loop {
        var scan = lobes.Lidar.distances

        // Find closest obstacle
        var min_distance = 9999
        var min_angle = 0

        for i in 0..360 {
            if scan[i] < min_distance {
                min_distance = scan[i]
                min_angle = i
            }
        }

        if min_distance < 50 {
            // Obstacle nearby
            avoid_direction(min_angle)
        }

        delay(100)
    }
}
Build configuration
Qbs build file
// MyCustomLobe.qbs
import qbs

StaticLibrary {
    name: "MyCustomLobe"

    Depends { name: "Qt.core" }
    Depends { name: "liblobes" }

    files: [
        "MyCustomLobe.cpp",
        "MyCustomLobe.hpp",
    ]

    Export {
        Depends { name: "Qt.core" }
    }
}
Dependencies
Add external dependencies as needed:
// For OpenCV
Depends { name: "opencv" }

// For network
Depends { name: "Qt.network" }

// For serial
Depends { name: "Qt.serialport" }
Best practices
- Thread safety - Use signals/slots for cross-thread communication
- Resource cleanup - Always clean up in
shutdown() - Error handling - Emit status changes on errors
- Configuration - Support runtime parameter changes
- Documentation - Document available data and methods
- Testing - Create unit tests for Lobe logic
Troubleshooting
Lobe not loading
| Issue | Solution |
|---|---|
| Not registered | Add to LobeFactory |
| Build error | Check dependencies in qbs |
| Initialization fails | Check initialize() return |
Data not reaching plans
| Issue | Solution |
|---|---|
| Signal not emitted | Call emit dataReady() |
| Wrong data format | Use QVariantMap correctly |
| Not connected | Verify signal connections |
Next steps
- Multiple Agents - Multi-Agent Setup
- Central Hub - Hub Setup
- Lobe reference - Lobes Reference