Configure Controller
Set up ArduMY hardware controller
Configure Controller
Set up an ArduMY-compatible controller (Arduino) to interface hardware with your OctoMY™ Agent.
Pro Tip
Start with an Arduino Mega 2560 if you're unsure - it has plenty of pins and PWM channels for most projects. You can always switch to a smaller board once you know your exact requirements.
What is ArduMY?
ArduMY is OctoMY™'s hardware interface protocol. It runs on Arduino-compatible boards and provides:
- Actuator control - Servos, motors, relays
- Sensor reading - Distance, temperature, IMU
- Real-time communication - Serial protocol with the Agent
- Fail-safe operation - Safe state on connection loss
Supported controllers
| Board | Pins | PWM | Best For |
|---|---|---|---|
| Arduino Mega 2560 | 54 | 15 | Complex robots |
| Arduino Uno | 14 | 6 | Simple robots |
| Arduino Nano | 14 | 6 | Space-constrained |
| ESP32 | 34 | 16 | WiFi-connected |
| Teensy 4.0 | 40 | Many | High performance |
Recommended: Arduino Mega 2560 for most projects.
Step 1: Flash ArduMY firmware
Using Arduino IDE
-
Download ArduMY firmware from OctoMY™ repository:
cd ~/Arduino/libraries git clone https://github.com/mrdeveloperdude/OctoMY-ArduMY -
Open Arduino IDE
-
Open the ArduMY sketch:
- File → Examples → OctoMY™-ArduMY → ArduMY
-
Select your board:
- Tools → Board → Arduino Mega 2560
-
Select port:
- Tools → Port → /dev/ttyUSB0 (or similar)
-
Upload:
- Click Upload button (→)
Using command line
# Install arduino-cli if not present
curl -fsSL https://raw.githubusercontent.com/arduino/arduino-cli/master/install.sh | sh

# Compile and upload
arduino-cli compile --fqbn arduino:avr:mega ArduMY
arduino-cli upload -p /dev/ttyUSB0 --fqbn arduino:avr:mega ArduMY
Step 2: Connect controller to Agent
Physical connection
| Platform | Connection |
|---|---|
| Linux/Desktop | USB cable |
| Raspberry Pi | USB cable or serial GPIO |
| Android | USB OTG adapter |
Serial permissions (Linux)
# Add user to dialout group
sudo usermod -a -G dialout $USER

# Apply changes (or logout/login)
newgrp dialout
Step 3: Configure in Agent
On the Agent device:
- Open ☰ Menu → Settings
- Go to Hardware → Controller
- Tap [Add Controller]

Step 4: Verify connection
After connecting, verify communication:

Step 5: Configure serial settings
Adjust serial communication if needed:
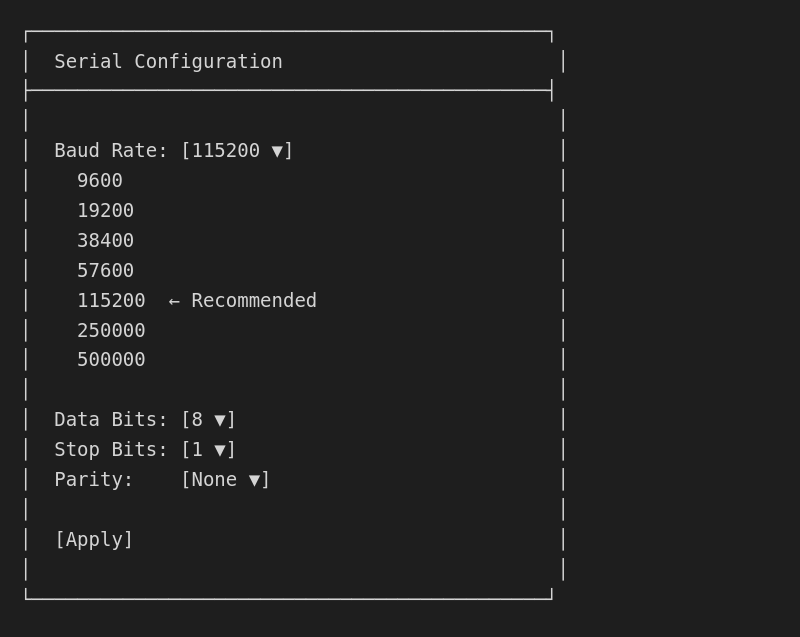
Note: Baud rate must match firmware setting.
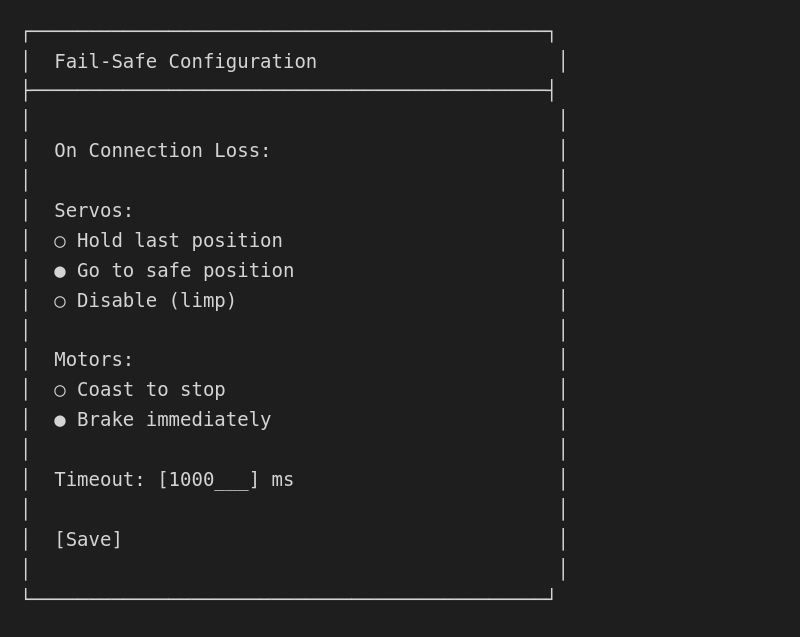
Step 6: Configure fail-safe
Set what happens when connection is lost:
Multiple controllers
For complex robots, connect multiple controllers:

Pin configuration
View pin map

Reserved pins
Some pins are reserved:
| Pins | Purpose | Notes |
|---|---|---|
| 0, 1 | Serial RX/TX | Communication with Agent |
| 13 | Built-in LED | Can be used, but LED flickers |
| 20, 21 | I2C (Mega) | For I2C sensors |
| 50-53 | SPI (Mega) | For SPI devices |
Troubleshooting
Controller not detected
# Check USB connection
lsusb | grep -i arduino

# Check serial device
ls /dev/tty*

# Check permissions
ls -la /dev/ttyUSB0
"Permission denied" error
# Add to dialout group
sudo usermod -a -G dialout $USER

# Immediate fix (temporary)
sudo chmod 666 /dev/ttyUSB0
Communication errors
- Check baud rate - Must match firmware
- Check cable - Use quality USB cable
- Check interference - Keep away from motors
- Reset controller - Press reset button
Firmware version mismatch
Agent expects: ArduMY v1.2.x
Controller has: ArduMY v1.0.0

Solution: Reflash controller with latest firmware
High latency
| Cause | Solution |
|---|---|
| Low baud rate | Increase to 115200+ |
| USB hub | Connect directly |
| Old cable | Replace USB cable |
| CPU load | Reduce Agent workload |
Command line configuration
Check controller status
# View connected controllers
./agent --list-controllers

# Test specific port
./agent --test-controller /dev/ttyUSB0
Set serial port
# Specify port at startup
./agent --personality MyRobot --controller /dev/ttyUSB0
Debug mode
# Enable controller debug output
./agent --personality MyRobot --debug-hardware
Configuration file
Controller settings are stored in:
~/.local/share/OctoMY™/OctoMY Agent/<personality>/hardware.json
Example:
{
  "controllers": [
    {
      "name": "Primary Controller",
      "port": "/dev/ttyUSB0",
      "baudRate": 115200,
      "firmware": "ArduMY",
      "failsafe": {
        "timeout": 1000,
        "servoAction": "safe_position",
        "motorAction": "brake"
      }
    }
  ]
}