Scene Tree Overlay (Construct)
How to read and edit the scene tree that floats over the Construct viewport.
What it is
The scene tree is a translucent list of your scene's items. It sits in the upper-left corner of the 3D viewport, and it is always on. It is the one place where you browse the scene, open an item to edit it, add items and move them.
Each item that you open shows its parameters inside the tree, in a box. You do not need a separate properties panel.
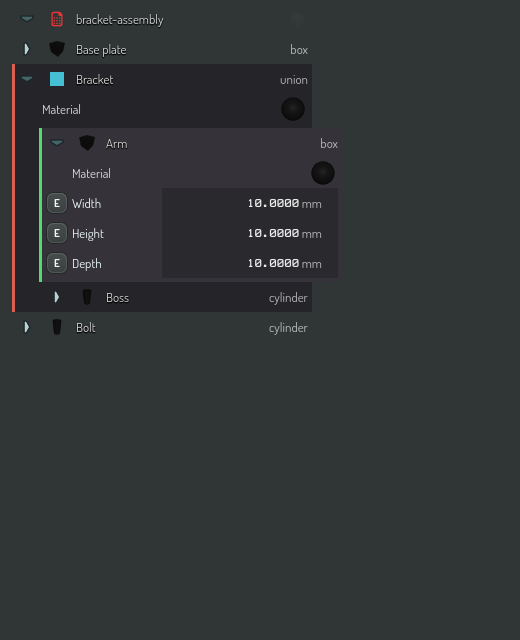
Read a row
Each row shows, from left to right:
- Caret. Click it to open or close the item.
- Icon. For an SDF primitive, this is a rendered thumbnail of its definition, so every sphere has the same icon. An operator shows a thumbnail of its whole subtree. Meshes, groups, tet volumes, domains and cameras show their type's glyph. The icon is also the visibility button: click it to hide the item, and it shows a crossed-out eye. Click it again to show the item. A hidden item stays in the tree, dimmed, and the viewport does not draw it.
- Name. Double-click it, or press F2, to rename the item. A long name ends in "…", and its tooltip shows the full name.
- Type. At the right end of the row: the item's definition, such as "sphere" or "union", or its kind, such as "group" or "camera". Click a definition to open it in the definition editor.
Some rows also have buttons in a column at the right edge. A bounding volume has its own buttons, and so has a component. These buttons always stay in the same column, so they line up from row to row.
The top row is the scene itself. Its name is the document's file name, or (unsaved).
Open an item
Click the caret to open an item. The item then draws a box, and the box holds, from top to bottom:
- The item's own row.
- The Material row. The sphere at its right end shows the material, and its tooltip names it. Click the sphere to choose a different material. Double-click it to open the material editor on it.
- The parameter rows.
- The transform rows, if the item has a transform. See Transform rows.
- The children. A child that you open draws its own box, inside this box.
A group has no parameters. Its box holds the transform rows, the Isolated (SDF domain) check box, and the children.
A closed item draws no box. At the top level its row has a translucent dark background. Inside an open box, a closed item's row ends one step short of the box's right edge, so the box contains it.
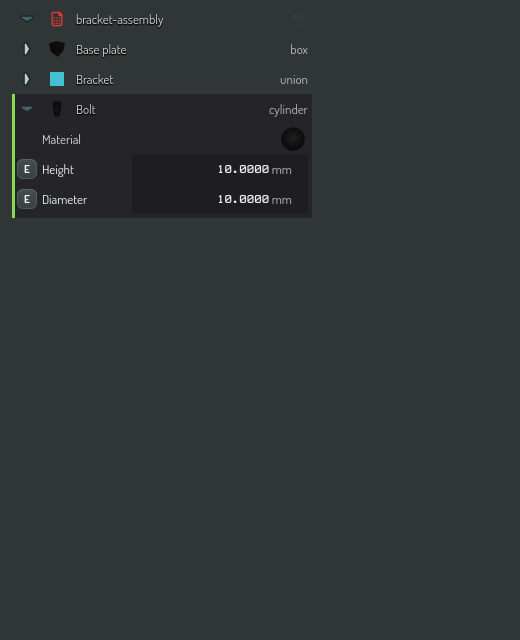
Every box has the same width
Every box in the tree has the same width, whatever the length of the names in it. So a box that sits further to the right is deeper in the tree. Its width does not tell you anything.
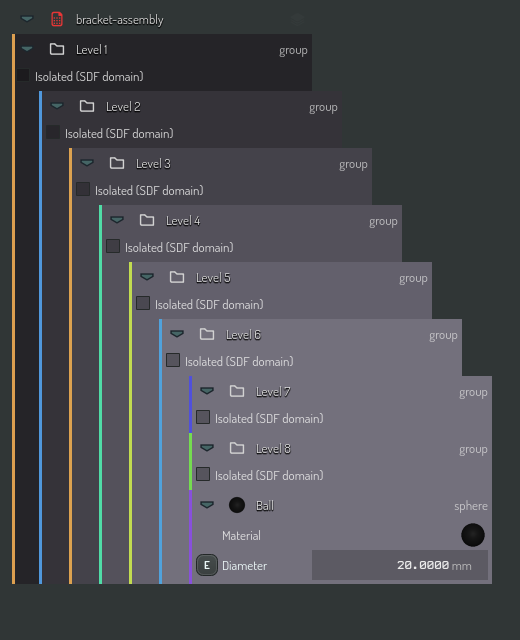
Depth reads from the indent and from the background
Each level of depth moves the box one step to the right. A child's box keeps the full width, so it reaches one step past its parent's box on the right.
An open box has an opaque background. Each level is one shade lighter than the box around it, so you can read the depth of a box from its background.
The indent stops after six levels. Past that, a deeper box does not move further right. If it did, its values would go off the edge of the overlay, which does not scroll sideways. The background also stops at its lightest shade there.
The line tells you which item a box belongs to
A colored line runs down the left side of every open box, just outside it. Each item has its own color, and it keeps that color. When boxes sit inside each other, the line tells you which item a box belongs to.
Edit parameters
Every parameter row in a box has the same three columns:
- The E button. Click it to change between a value and an expression.
- The parameter's name.
- The value.
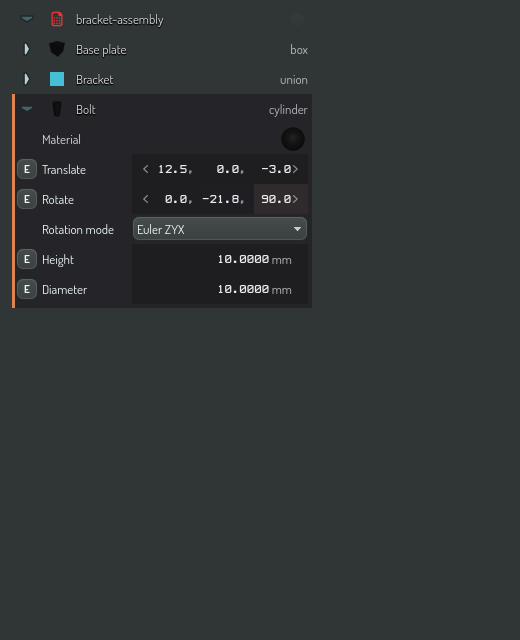
The columns line up through the whole box. A vector, such as a position,
shows as one box beside its name: <x, y, z>, then its unit once, as in
<12.5, 0.0, -3.0> mm. Numbers in a column put their decimal points under
each other, so a row that shows tenths and a row that shows thousandths still
line up.
When the tree is taller than the screen, you can drag it up and down. A drag that starts on a value changes the value; a drag anywhere else scrolls the tree.
If you drag a value, the drag follows the parameter's scale. A parameter that covers several orders of magnitude, such as a radius, changes by about ten times for each 200 pixels of drag. You can go from a 10 mm sphere to a 100 m sphere without the spin box.
Each number in a vector is its own control. Drag a number to change it; the other numbers stay as they are, even if your pointer passes over them. Hold the pointer over a number to show its step arrows, and click an arrow to change that number by one step. A number without a step changes by one unit of its last shown decimal.
Double-click a number to type its exact value. Press Enter to keep it, or Escape to cancel. Tab takes you to the next number of the vector, and Shift+Tab to the previous one.
Transform rows
There is no TRS button. A transform row (translate, rotate or scale) shows when it holds a value that is not the default, and is hidden at the default.
To give an item a transform, use the gizmo in the viewport. The row appears when the gizmo gives the channel a value. Edit the row like any other parameter. If you set it back to its default, the row hides again.
Look through a camera
A camera's row has a dot at its right end. Click it to make the viewport look through that camera; the dot fills. Click the filled dot to go back to the editor camera. The toolbar's camera list shows the same choice.
Select items
Click a row to select the item. Ctrl-click adds an item to the selection or removes it. Shift-click selects every item between the last click and this one.
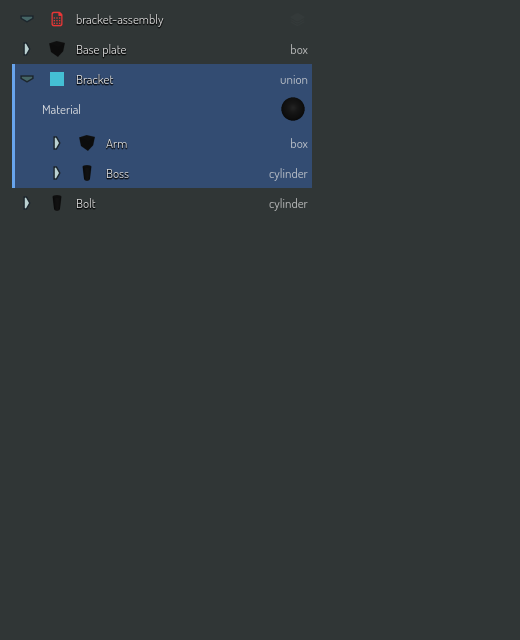
A selected row has a blue wash. If the selected item is open, the wash covers its whole box, children included, so you see the whole branch that you selected.
Add items
Move the mouse into the gap between two rows. A line appears in the gap, at the indent where the new item will go, with a tag at its end. The tag has six buttons:
| Button | Adds |
|---|---|
| SDF | an SDF primitive or operator, from the searchable definition picker |
| Group | an empty group |
| Mesh | a mesh, from a file |
| Camera | a camera |
| Bounds | a bounding volume |
| Reference | a reference image, from a file |
The line and the tag stay in the gap. They do not cover the rows above and below it.
Right-click the line for a menu that adds at the same place. You can also right-click a row:
- Add before… adds an item at this row's place, before it.
- Add child… adds an item at the end of this row's children. It is available on every SDF item, group and SDF domain — a primitive too. See Put an item inside another item.
To add an item at the end of the top level, right-click the scene's top row.
Move items
Drag a row to move the item. While you drag, lines open in the gaps between rows, at each indent where the item can go. Drop on a line to put the item there. An open slot under a closed or empty container takes the item as its child.
The tree refuses a drop that makes a cycle. Every SDF item, group and SDF domain takes children. A component instance does not: open its definition to change its parts.
Put an item inside another item
Any SDF item can hold other items, a primitive as well as an operator. What the parent does with a child depends on the parent:
- An operator acts on its children. A union joins them, a subtraction cuts the later ones out of the first, a smooth union blends them.
- Every other parent only carries its children. A child of a sphere, a box or a group moves, turns and scales with its parent. It keeps its own shape, and the parent does not cut or blend it.
So to make a part that moves with a body — a wheel on a chassis, say — drop the wheel onto the chassis. To join or cut shapes, put them under an operator.
A group carries its children the same way: move the group and everything in it follows.
A mesh, a tet volume, a camera, a bounding volume or a reference image can sit inside an SDF item or a group too. It follows the parent's position and rotation, through every operator above it: put a mesh on a twisted bar and it rides the twist and turns with it. It keeps its own size, so a scaled parent does not stretch it.
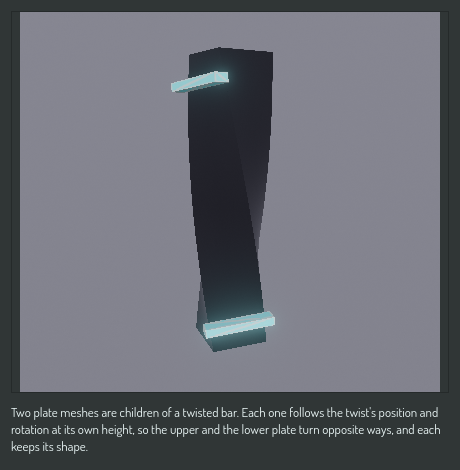
If Construct cannot place such a child exactly, its row shows a marker after the name, and the tooltip says why:
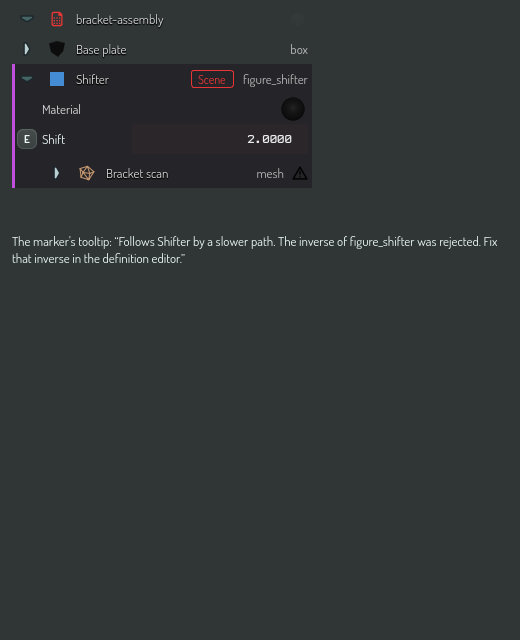
- A warning marker means the child still follows, by a slower path, because the inverse of one of the parent's operators was rejected. Fix that inverse in the definition editor (see Write a transform operator).
- An error marker means the child could not follow and stays where it was. Move the item, or change the operator the tooltip names.
It works the other way round as well: a mesh, a tet volume, a camera, a bounding volume or a reference image can hold SDF items and groups. Use Add child… on its row, or drop an item onto it. The child follows the holder's position, rotation and size, as a mesh inside another mesh does. Hide the holder and the items it holds hide with it.
Delete an item and everything under it goes with it: the items it holds, of every kind, and what they hold in turn. One undo puts all of it back, each item under its own parent.
Older scenes that already had an item under a primitive now show it: that child used to be saved but not drawn.
Busy items
While Construct works on an item, its row shows a spinner in place of its icon and a bar in place of its name: during a bake, a freeze, a mesh import or a regenerate, for example. The bar fills when the work reports its progress.
A change to the structure of the scene also makes work: Construct builds the shapes of the items that the change touched, then evaluates their expressions. Those items show "Building" and then "Evaluating" while that work waits or runs. Work that ends within 150 ms shows no spinner, so most edits never show one.
A busy item still selects, opens and closes, and the arrow keys still move through the tree. It refuses what would change it until the work ends: renaming, hiding, deleting, dragging, its parameter rows, the buttons at the end of its row and its row menu.
Use the keyboard
When a row has the focus:
| Key | Does |
|---|---|
| Up, Down | move to the previous or next row |
| Right, Left | open or close the item |
| F2 | rename the item |
| Space | hide or show the item, as a click on its icon does |
| Delete | delete the item, or the whole selection if the item is part of it |
The row menu
Right-click a row for its menu. It has, among others:
- Add before…, Add child…, Wrap in… and Replace with….
- Duplicate, Hide or Show, Delete and Rename.
- Freeze or Thaw.
- Nest, and for a component Unnest, Explode component and Finalize.
- Export, Bake and Import mesh….
To put items in a group, select them and use Wrap in… with a group.
Parameters on the scene root
Open the top row, the one that names your document. Its Parameters box holds your document's variables. Expressions anywhere in the scene can use them.
The box has three kinds of section, from top to bottom:
- Built-in. Read-only variables from the engine, such as the time and the frame index. Open the section to see the names that you can use in expressions.
- Default. Your document's main set of variables. It is always there.
- Named varsets. More sets that you make, to keep variables that belong together, for example fasteners.
Built-in and Default start folded, so the box stays small. The tree remembers when you open one.
To add a variable, click the add button on the Default header or on a named varset's header. To add a named varset, click Varset in the header of the Parameters box. To remove a variable, click its remove button. If you remove the last variable of a named varset, the varset goes too.
Click E on a variable to make it an expression. The value to its right updates as the expression changes.
Select a variable to open a small editor under it for the variable's schema: its description, unit, range and step. The fields depend on the variable's type. Click outside the editor to close it.
To save the schema as JSON for another tool, click Export in the header of the Parameters box.
Ask OPAL
The assistant can do everything on this page through its tasks. Two of them matter most when you work with it in the tree:
- OPAL can select items for you. When it finds an item, it selects it before it tells you which one it means. The row and the viewport then show you the item, and a name cannot be misread.
- OPAL can group the selected items, or ungroup a group, as one step that one undo reverses.
See Construct selection and grouping tasks.
When OPAL reads an item with construct.scene.get_item, the answer also holds
world, the item's place in the scene as a 4 × 4 transform, and for a mesh or
another such child of an SDF item or a group, leaf: whether Construct could
place it, and which operator decided. Neither is saved.
Hide the gizmos
The toolbar has a button with the tooltip Toggle gizmos in viewport. It hides every gizmo handle in the viewport. With the gizmos hidden, a click on a place where a handle was selects what is under it. Construct remembers the choice for the next session.
What changed in this version
The tree is wider. Every box has the same width now. A box that sits further right is deeper, and its size tells you nothing.
The TRS button is gone. A transform row shows by itself when it holds a value. Use the gizmo to give it one.
The indent stops after six levels. A deeper step pushes the values off the edge. The background still tells you the depth.
The yellow outline is gone. It drew over the row that it pointed at. The line between rows stays. Its indent tells you which parent will get the new item, and its tag sits clear of the rows.
Size no longer follows a scaled parent. A mesh, a camera or another non-SDF item inside an SDF item or a group follows its parent's position and rotation, through every operator above it, and keeps its own size. A row whose item Construct cannot place exactly shows a warning or an error marker.
No capability went away.