Use the chat overlay
Send messages and read AI responses
Use the chat overlay
The OPAL chat overlay is a floating panel for interacting with your configured LLM.
Opening the overlay
Click the OPAL button in the window header bar. The overlay appears attached to the right side of the window (in wide mode) or at the bottom (in tall/mobile mode).
Sending a message
- Type your message in the input field at the bottom of the overlay.
- Press Enter to send, or click the Send button.
- The AI response streams in token-by-token, then renders as formatted content blocks.
Pro Tip
Press Shift+Enter to insert a newline without sending.
Reading responses
Responses are rendered as chat bubbles:
| Bubble | Alignment | Meaning |
|---|---|---|
| You (blue) | Right | Your messages |
| OPAL (green) | Left | AI responses |
| Warning (orange) | Left | Non-critical issues (e.g. empty response) |
| Error (red) | Left | Failures with actionable buttons |
Responses may contain multiple content blocks:
- Plain text — simple unformatted text
- Markdown — text with formatting (headings, bold, lists, links)
- Code blocks — syntax-highlighted code (C++, JSON)
- Task plans — structured plans that OPAL can execute on your system
All text is selectable and copyable. Unknown content types are displayed as plain text.
Managing conversations
Conversation persistence
Conversations are automatically saved to disk. You don't need to do anything — your chat history is preserved between sessions. Each message records its timestamp and token usage.
New conversation
Click New in the conversation bar to start a fresh conversation. Previous conversations are preserved and can be accessed via the dropdown.
Switch conversations
Use the dropdown in the conversation bar to switch between saved conversations. The dropdown shows conversation titles (auto-generated from the first message) and message counts.
Browse full history
Select Conversation history from the hamburger menu (☰) to open a full
browser: every saved conversation, with delete, delete-all, copy, and open
actions. This works the same way in every app, standalone construct
included.
Retention policy
Select a retention policy from the dropdown to control how long conversations are kept:
| Policy | Behavior |
|---|---|
| 24h | Conversations older than 24 hours are automatically deleted |
| 7d | Kept for one week |
| 30d | Kept for one month |
| Forever | Never automatically deleted |
Pruning runs automatically when the app starts. Changing the retention policy affects future pruning only — existing conversations are evaluated on next startup.
Overlay controls
The title bar shows the active model on the far left. Every other control sits in one menu on the far right, next to Close:
| Control | Action |
|---|---|
| Model name (far left) | Shows the current default provider and model. |
| Hamburger menu (☰) | Opens a menu with LLM settings, New conversation, Conversation history, Toggle fullscreen, Pop out into separate window, and Save chat to file. See Manage your LLM setup for the first two. |
| Close button (X) | Hide the overlay. |
| Drag title bar (wide mode) | Switch overlay between left and right edge. A ghost preview appears on the opposite side; the overlay becomes semi-transparent so you can see what's behind it. |
| Drag title bar (tall mode) | Resize overlay height by dragging vertically. |
| Drag edge handle | Resize overlay width or height. |
| Escape key | Hide the overlay. |
The overlay remembers its position, size, and visibility between app sessions.
Readiness banner
If the LLM is not configured, an orange banner appears above the input area
with a description of what is missing and a Configure button. The button
opens the LLM settings screen directly inside the overlay — the same screen
the hamburger menu's "LLM settings" item opens. This works the same way in
every app, standalone construct included.
The input field is disabled while the banner is visible. Once you configure a provider and model, the banner disappears automatically.
Let the assistant look at the app
The assistant can see the application, not just read your text. Ask it a question about shape, layout or orientation and it will take a picture rather than ask you to describe what you are looking at.
This matters most for spatial questions. If you ask the assistant to build a valve handwheel in construct and the spokes come out wrong, describing the fault in words takes several exchanges and still loses detail. One picture settles it.
Three things are worth knowing.
It needs a model that accepts images. Most current online Claude models do. If your selected model does not, the assistant tells you so and names the model, rather than guessing at an answer it cannot see. Switch models from the hamburger menu's LLM settings.
Looking costs part of the conversation budget. An image is charged by its area, so a large screenshot costs far more than a small one. The assistant already prefers the cheap options — a cached thumbnail of a single piece costs roughly a hundredth of a full-window capture — but if you ask for many pictures in one conversation, you will reach the model's context limit sooner.
It only ever sees this application. Every picture it takes is drawn by the app itself, not read off your screen. Other windows never appear in it, even when they are sitting on top, and nothing outside the application window is ever captured.
You do not need to do anything to turn this on. Just ask a question that a picture would answer.
Give the assistant a folder or an archive
Drag a folder onto the chat input and drop it. A listing appears: the names and sizes of what is inside, with a tag above the input showing that the folder is now attached.
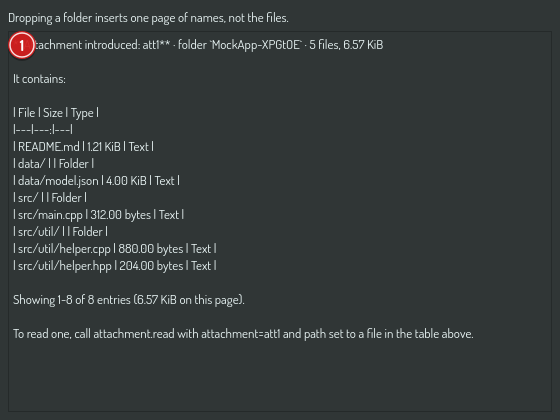
The listing is deliberately not the contents. A folder of source runs to megabytes, and pasting it would spend most of the conversation before you had asked anything. What you get instead is a table of contents, and the assistant reads the parts it needs.
An archive works the same way and is never unpacked. Dropping a 3 GB zip costs about as much as dropping a small one, because only its index is read. A single file is inflated when the assistant actually asks for it.
What the assistant can do with it
It searches first and reads second, which is the cheap order.
| It wants | It uses |
|---|---|
| Which files exist | attachment.glob, for example every *.cpp |
| Which file mentions something | attachment.grep, which answers with file and line |
| What one file says | attachment.read, by line number |
The assistant names these in its replies. A picture inside the folder comes back as a picture it can look at, rather than as a description.
What it cannot do
It cannot read outside what you dropped. The drop is the permission. A path that climbs out of the folder is refused, including through a shortcut or a symbolic link that points elsewhere.
It cannot change anything. There is no write, no rename and no delete. Your folder is read where it sits and is never copied.
It cannot see a very large listing all at once. A page holds 200 names and says how many there are in total, so the assistant asks for the next page when it needs one. If it tells you a file is not there, check whether it has only seen page one.
Pro Tip
There is no approval prompt. Dropping the folder is the approval. Asking again for something you handed over a second earlier trains you to click through prompts without reading them.
Taking it back
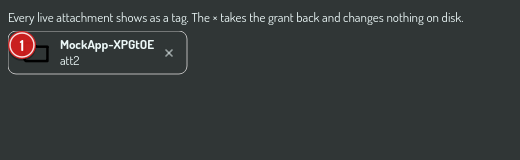
Each attachment shows as a tag above the input. Click the × on a tag and the assistant can no longer read that material. Nothing on your disk changes: the folder was never ours, and closing a tag only forgets where it was.
Attachments last for as long as the application is running. They are not saved, so starting the application again begins with none.